Your own self-hosted CI/CD - Forgejo Runner
If you’ve replaced using GitHub with a self-hosted Forgejo like I did in the previous post, you may also wanna replace GitHub Actions. This would nicely bring CI/CD into the realm of possibilities in the homelab and allow for a clean DevOps workflow.
I’ll need some CI/CD pipelines soon, to for example automatically publish this blog, or to compile Go or C source code automagically upon a new commit/tag.
This is all possible thanks to Forgejo Actions - specifically, enabled by hosting an instance of a Forgejo Runner. This is what I’ll be getting to work today.
Hosting possibilites overview
Runner type
Forgejo Runners can be hosted in the following configuration:
- Docker - everyone knows what docker is
- Podman - more secure and better docker, my choice for this setup
- LXC - lack of pre-built images unlike podman/docker, also may cause issues due to LXC in LXC nesting if the forgejo runner itself will run in an LXC, may be a good options for jobs requiring a full init system to test on, as it provides a full linux environment
- Host - jobs run directly on the host machine of the runner with no isolation, can be acceptable for very simple jobs but it compromises the host system and can break it, use with caution
My choice for this setup is Podman - more secure than docker and deals with IPv6 way better, while providing the benefit of having a lot of pre-built community images unlike LXC.
The drawback is the network setup - same as with Docker, it’s really messy, though less so than Docker. LXCs are cleaner with that, though LXCs have other cons.
Podman networking choice
For this setup, I want to have the podman containers be put on the same layer 2 network as the Forgejo Runner host itself. I wanna avoid NAT or having the network be routed. I also wanna hand off IPAM (IP Address Management) from the managed Podman one, to just SLAAC on the layer 2.
The possibilites for Podman are:
- Bridge - creates a bridge on which the containers are put. Defaults to Masquerade NAT for communication to the outside world and the use of built-in IPAM with local addresses - this behavior can be overriden
- MACVlan - splits the physical interface of the host system, and puts the containers directly on that network. It’s a bit lighter than a bridge, but prevents communication between the containers, and the real interface of the host machine
- Host - uses the network stack of the host directly. Simplest option but may cause port conflicts and breaks network isolation for localhost
Counterintuitively, I’ll choose Bridge for this. I’ll disable IPAM and NAT, and include the ethernet interface of the host in the bridge. It may sound like MACVlan with extra steps, but I want the podman containers to be directly and natively on the same layer 2 network as the host, without preventing communication with the host like with a macvlan.
Preparing the host
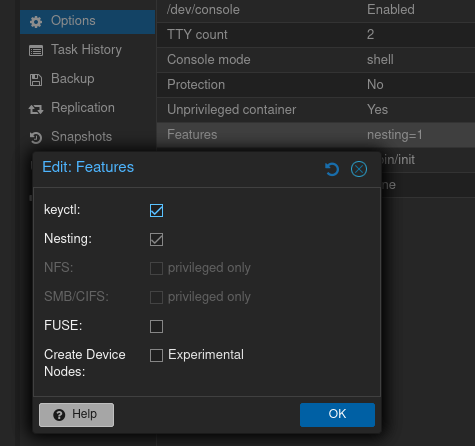
I’ve already created an LXC and did all my usual configuration on it. I put the LXC on my DMZ VLAN and turned on keyctl and nesting in the optional settings - this is important for Podman to work
(As a sidenote, due to that for this host I switched from UFW to just plain NFTables, you can do the same to make your life easier)
Install the Forgejo Runner binary
Following the official Forgejo Runner installation guide, let’s run the installation script.
jq available - if not, install it:apt install jq (on debian)export ARCH=$(uname -m | sed 's/x86_64/amd64/;s/aarch64/arm64/')
export RUNNER_VERSION=$(curl -X 'GET' https://data.forgejo.org/api/v1/repos/forgejo/runner/releases/latest | jq .name -r | cut -c 2-)
export FORGEJO_URL="https://code.forgejo.org/forgejo/runner/releases/download/v${RUNNER_VERSION}/forgejo-runner-${RUNNER_VERSION}-linux-${ARCH}"
wget -O forgejo-runner ${FORGEJO_URL} || curl -o forgejo-runner ${FORGEJO_URL}
chmod +x forgejo-runner
wget -O forgejo-runner.asc ${FORGEJO_URL}.asc || curl -o forgejo-runner.asc ${FORGEJO_URL}.asc
gpg --keyserver hkps://keys.openpgp.org --recv EB114F5E6C0DC2BCDD183550A4B61A2DC5923710
gpg --verify forgejo-runner.asc forgejo-runner && echo "✓ Verified" || echo "✗ Failed"Make sure the output is
Good signature from "Forgejo <contact@forgejo.org>"
        aka "Forgejo Releases <release@forgejo.org>"
✓ Verified
Now, copy it to /usr/local/bin/forgejo-runner withcp forgejo-runner /usr/local/bin/forgejo-runner
Download a systemd service
Download a service file by running
curl -o /etc/systemd/system/forgejo-runner.service https://code.forgejo.org/forgejo/runner/raw/branch/main/contrib/forgejo-runner.serviceThen, we need to modify it. The default config assumes we’re running a runner user for unpriviledged podman. For our bridge network to work, we need to run podman with root access. Let’s modify the service like so:
# cat /etc/systemd/system/forgejo-runner.service
[Unit]
Description=Forgejo Runner
Documentation=https://forgejo.org/docs/latest/admin/actions/
After=docker.service

[Service]
ExecStart=/usr/local/bin/forgejo-runner daemon -c /etc/runner/config.yml
ExecReload=/bin/kill -s HUP $MAINPID

WorkingDirectory=/etc/runner
Restart=on-failure
TimeoutSec=0
RestartSec=10

[Install]
WantedBy=multi-user.target
Preparing Podman
Install it first with:
apt install podmanThen, enable the system-wide podman socket
systemctl enable --now podman.socketCreate a Podman hook - workaround for SLAAC
This is ugly, but had to be done. SLAAC takes 2 or 3 seconds for the container to get its IP address, but Forgejo runs the jobs on the container regardless of the network status. One of the options would be adding - run: sleep 3 to EACH of our workflows, but this is just nuts.
The other way of solving this, is to create a podman hook, that awaits whether a default route is present, and only if it is, it then marks the container as ready for forgejo.
Create a folder /usr/share/containers/oci/hooks.d/. Now, edit a file in that folder, calling the file whatever - mine is called 99-wait-for-ipv6.json. Paste this into it:
{
  "version": "1.0.0",
  "hook": {
    "path": "/usr/local/bin/wait-for-ipv6.sh"
  },
  "when": {
    "always": true
  },
  "stages": ["prestart"]
}
This created an OCI hook that runs /usr/local/bin/wait-for-ipv6.sh before the container fully starts.
Now, let’s create the script in /usr/local/bin/wait-for-ipv6.sh to run. It could be a sleep 3, but I went for something a bit longer: getting the PID of the container from OCI JSON (requires jq package on the host system, you may have it already from a previous step), and then waiting for 10 seconds during which, the script checks whether a default route is present inside of the container. If it’s there - it succeeds, if it’s not there after 10 seconds, it gives up and also succeeds (just so the job doesn’t hang if the network is down)
#!/bin/sh
PID=$(jq -r '.pid')

timeout 10 sh -c "
	while ! grep -q '^00000000000000000000000000000000.*eth0' '/proc/$PID/net/ipv6_route' 2>/dev/null
	do
		sleep 0.2
	done
" || exit 0
Let me know if you find a cleaner way of dealing with the SLAAC issue, you can reach me via maciej.kowalski@fibermouse.xyz.
Configuring the network
Systemd-networkd
Currently, this is my systemd-networkd configuration for eth0 interface
# cat /etc/systemd/network/05-eth0.network
[Match]
Name=eth0

[IPv6AcceptRA]
Token=::c1cd:1
My goal here is creating a bridge - br0, and enslaving eth0 under it.
First, I’ll move the 05-eth0.network config to 10-br0.network and modify it so that Name=br0 instead.
Then, let’s create the bridge device. A .netdev file like this is needed:
# cat /etc/systemd/network/10-br0.netdev
[NetDev]
Name=br0
Kind=bridge
As the last step, we gotta enslave eth0 under the bridge, lets set the eth0 .network file to:
# cat /etc/systemd/network/05-eth0.network
[Match]
Name=eth0

[Network]
Bridge=br0
Now let’s reload networkd with networkctl reload. After a second or two, our IP addres should’ve moved to the newly created br0
# ip -br a
lo               UNKNOWN        127.0.0.1/8 ::1/128
eth0@if45        UP
br0              UP             2a01:115f:4015:28b0::c1cd:1/64 fe80::e428:45ff:fe76:5a9c/64
Podman
We gotta make podman know our br0 exists. This command will create an unmanaged network inside of podman, using our br0 interface.
podman network create \
  --driver bridge \
  --opt com.docker.network.bridge.name=br0 \
  --opt mode=unmanaged \
  --ipam-driver none \
  --ipv6 \
  br0
Now, let’s force it to properly handle DNS as it tends to default to a legacy IP of google dns - 8.8.8.8
We can change it in /etc/containers/containers.conf so let’s edit it and add:
[containers]
dns_servers = ["2a01:115f:4015:2810::53:1"]
Of course changing the IP of my server with your own server of choice
Testing podman
We can run a quick test if everything works. Let’s spin up a quick Alpine Linux container on our br0 network with
podman run --network br0 -it --rm alpine shThis will run the container, drop you into the Shell, and remove it when you’re done checking if everything looks good.
Check for stuff like ip addr command, cat /etc/resolv.conf, and ping some stuff whether it looks good to you.
Runner configuration and registration
The default configuration can be generated with the command below
mkdir /etc/runner
forgejo-runner generate-config > /etc/runner/config.yml
Now, let’s go to our Forgejo instance, in my case: https://git.fibermouse.xyz If you want your Forgejo Runner to be assigned globally, log in as admin. If not, you can make it be a runner for a specific repository or organization. I’ll make mine be available globally to my whole instance.
So, let’s go into Site Administration > Actions > Runners and press Create new runner
Then, name it however you want - I’ll go by the hostname. Copy the runner configuration file provided there.
Now go back to the Forgejo Runner config to edit it - vim /srv/runner/runner-config.yml
The default configuration is well explained with comments inside of it.
This is what my configuration looks like. In the bottommost section, you can paste the copied config like I did:
log:
  level: info
  job_level: info

runner:
  capacity: 4
  labels:
    - "debian-latest:docker://debian"
    - "alpine-latest:docker://alpine"
    - "archlinux-latest:docker://archlinux"
    - "almalinux-latest:docker://almalinux"

cache:
  enabled: true

container:
  network: "br0"
  docker_host: "unix:///run/podman/podman.sock"

server:
  connections:
    forgejo:
      url: https://git.fibermouse.xyz/
      uuid: ****************
      token: ***************
In the labels section, I created a few labels, defining Docker/Podman images that this runner is allowed to use. I’ve only created labels here for the four main linux distros, but I may add taks-specific stuff too, like a hugo image for example. Adjust it all to your needs.
Now, with the config ready, we can launch our Forgejo Runner and let it start on boot with:
systemctl enable --now forgejo-runnerTo confirm it works, it should be listed in green as Idle on the runner list
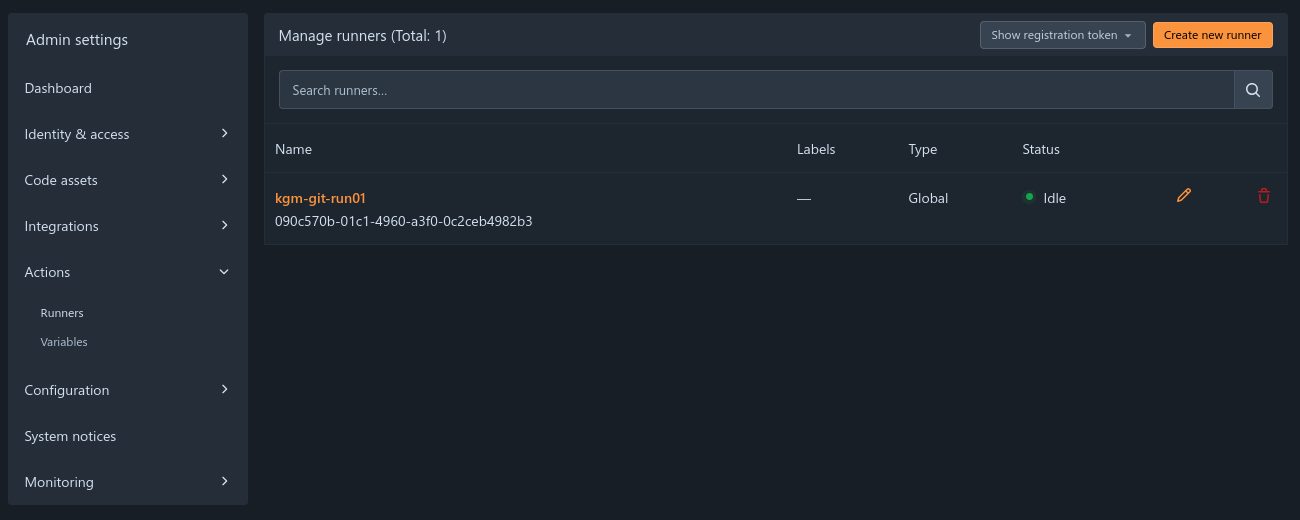
Aaaand that is it! You can now work with Forgejo Actions in your repos! For more information regarding Forgejo Actions specific syntax and workflow, see the official Forgejo Actions guide