Tired of Github? Self-host Forgejo!
Are you annoyed with Microsoft’s corporate rule over Github? Or perhaps you’ve been waiting way too long for GitHub to support IPv6? (They still don’t, 30 years old protocol BTW)
~ % dig github.com A +short
140.82.121.4
~ % dig github.com AAAA +short
64:ff9b::8c52:7904    # DNS64 magic there, no native IPv6 :)
Then you are in luck! This guide will explain how I started self-hosting my own Forgejo instance at git.fibermouse.xyz including OIDC support for SSO login using Keycloak.
Prerequisites:
- A server / VPS / EC2 where you can host it (I’ll be using my home server running proxmox and a debian LXC)
- Domain name where the Forgejo server can be accessed. Either an internal one you host, like home.arpa, or a public one. (I have mine registered with OVH DNS)
- Optional: If you want the Forgejo instance to be publicly accessible, along having a public domain name, ensure the network your server will be in allows opening ports on the firewall, and for legacy IP support - allows for port forwarding
- Optional: Keycloak instance to use for SSO login
Setting up the host
To host Forgejo, you’ll need a linux server. I’ll be using a Debian 13 LXC container hosted on my proxmox server.
Create an LXC in Proxmox
Just a normal Debian 13 LXC from the official template.
I gave mine 1 vCPU and 512MB of RAM. I’ll probably adjust that later depending on the demand. Forgejo is really lightweight, but I’ll keep it at 512MB for now so the install process goes smoothly.
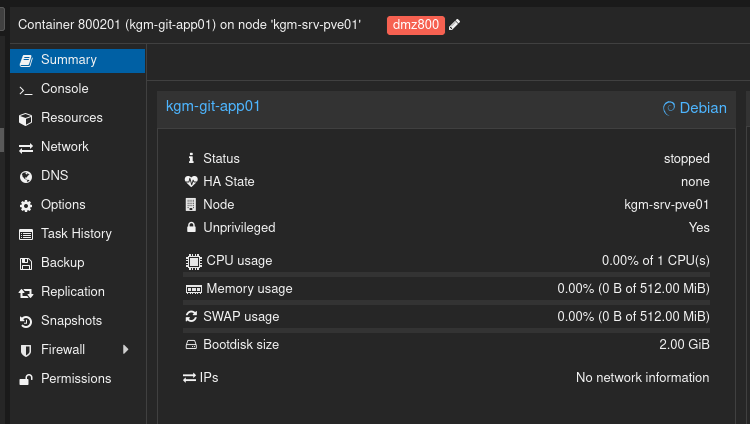 For the network settings, I’ve assigned the LXC to my DMZ VLAN as I’ll be hosting my Forgejo openly to the internet.
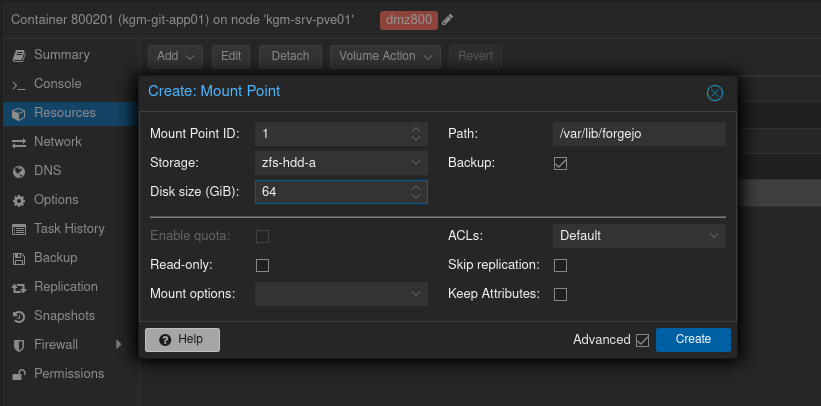
 As I use different storage pools depending on the type of data, to ensure the Git repositories are stored on my ZFS disk pool for data security, I’ve only given 2GB of local pool storage space to the LXC. This is enough for the system itself. Then, I’ve created a mountpoint with a path of
 /var/lib/forgejo for the LXC on my ZFS storage pool. This is where the Git repositories live by default.
Network setup
For the network setup of the LXC, as it already is in my DMZ VLAN, I’ll simply run systemd-networkd with the following config:
# /etc/systemd/network/05-eth0.network
[Match]
Name=eth0

[IPv6AcceptRA]
Token=::2222:1
This will set the host part of the IP received from Router-Advertisement to a convenient ::2222:1 adhering to my convention for server addressing. With the convenience of the modern internet protocol (IPv6) you may even omit the [IPv6AcceptRA] block and fully rely on SLAAC mac-address based IP. I do custom ones for fun mostly.
System setup
As usual for all my hosts, I’ll be installing common system utilities, and making the system more secure and comfortable to use via my custom enrollment script. The host will be enrolled into my FreeIPA domain too.
More on basic LXC system setup I do, can be read here: Automating host configuration
For FreIPA LXC enrollment, see: &TBD
After the enrollment I do, the container will be configured with SSH management access, and will have a name in DNS.
Install Forgejo
On our freshly configured LXC, we can now set up Forgejo itself
Dependencies
Forgejo requires installing the git package and also git-lfs, LFS meaning Large File Storage.
sudo apt install git git-lfsGetting the binary
Visit the Forgejo download page, and use the provided wget command to download the latest version.
As the file name will vary depending on the version, I’ll use “nameofthefile” as a placeholder.
Then after the download, make the binary executable with:
chmod +x nameofthefileNow, copy it over to the /usr/local/bin/ folder, while renaming the binary to forgejo with:
sudo cp nameofthefile /usr/local/bin/forgejoCreating the git user and group
This can be done with:
sudo groupadd --system git
sudo useradd --system --shell /bin/sh --gid git --home-dir /srv/git --create-home git --comment 'Git Version Control'
The /srv/git home directory for the user, can be changed as you wish, to for example /home/git. I like to keep my non-interactive users separate though.
You may be scared of the –shell part. Worry not, the user will be non-interactive and login will be forbidden.
Providing a shell, as opposed to /bin/nologin is required for the ssh git operations to work properly.
Create necessary directories
As before in the LXC setup process, I made a mountpoint for Forgejo data, the folder for it should already be there, though it doesn’t hurt to check.
The permissions of it must also be adjusted:
sudo mkdir /var/lib/forgejo
sudo chown git:git /var/lib/forgejo
sudo chmod 750 /var/lib/forgejo
Forgejo will also store a config file in /etc/forgejo, so let’s create that:
sudo mkdir /etc/forgejo
sudo chown root:git /etc/forgejo
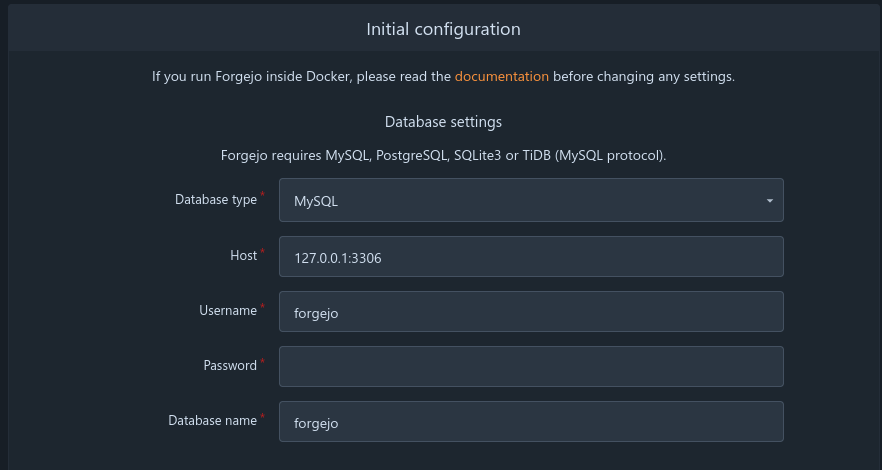
sudo chmod 770 /etc/forgejoDatabase setup (optional)
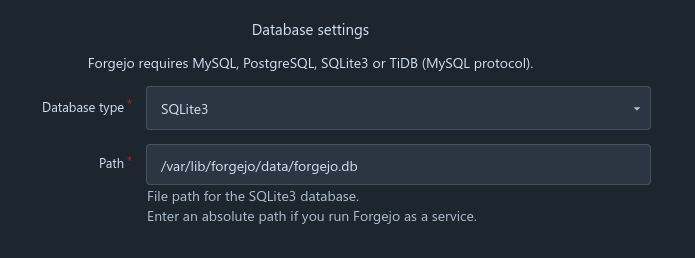
As my Forgejo install won’t be too big in scale and in the amount of users, I’ll rely on the local SQLite database that is the default.
If you’d want to use MySQL/MariaDB or PostgreSQL, you can see the official Forgejo install guide.
SystemD service
Download the SystemD .service file and put it in /etc/systemd/system/ with:
sudo wget -O /etc/systemd/system/forgejo.service https://codeberg.org/forgejo/forgejo/raw/branch/forgejo/contrib/systemd/forgejo.serviceMake sure everything looks good in the service file by editing it
sudo vim /etc/systemd/system/forgejo.service # or 'sudo nano (...)' :)You’ll need to do that if you’ll be using a database different than the default, or if you’ve changed the working directory, or home directory of the git user:

Then, reload the daemons and enable the service with:
sudo systemctl daemon-reload
sudo systemctl enable --now forgejo.service
If you’ve encountered any errors, the Forgejo log can be seen with:
sudo journalctl -xeu forgejo( -x is extra help in the log, -e jumps to the end of the log, -u chooses a specific service)
Web Configuration
After Forgejo has launched, it started hosting a HTTP GUI on port 3000.
So, let’s access the interface via a browser on port 3000:

Here you should see the defaults, we’ll be changing them soon:


Database
As mentioned before, we’ll be using SQLite3, which is the simplest and requires us to just change the DB type like so:
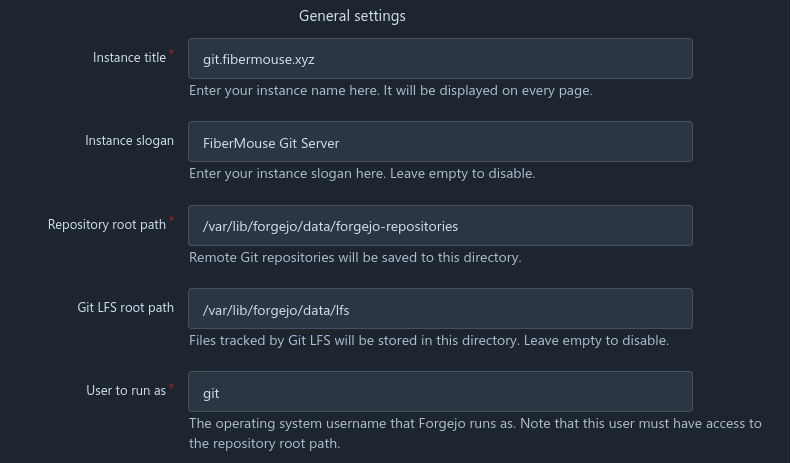
General
Here, I’ve decided to change the title and the slogan, leaving the storage and user options unchanged:
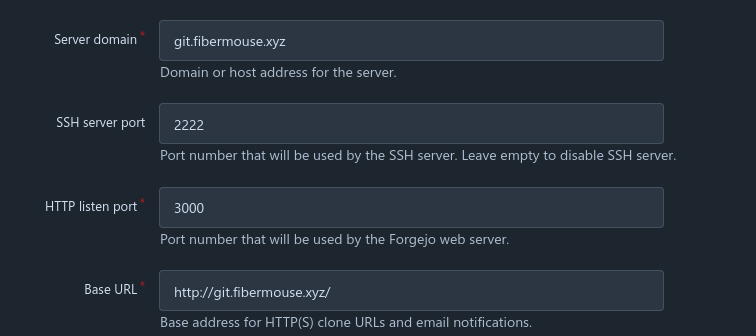
Next, I’ve changed the server domain from the FQDN to a higher level domain I chose where I’ll be hosting my instance - git.fibermouse.xyz
Same for base url.
I’ve also changed the SSH port from 22 to 2222, as I’ll be keeping port 22 for management only, allowing SSH clone only over the higher port.
The HTTP port will stay at 3000, as later I’ll be putting Caddy Reverse Proxy in front of it.
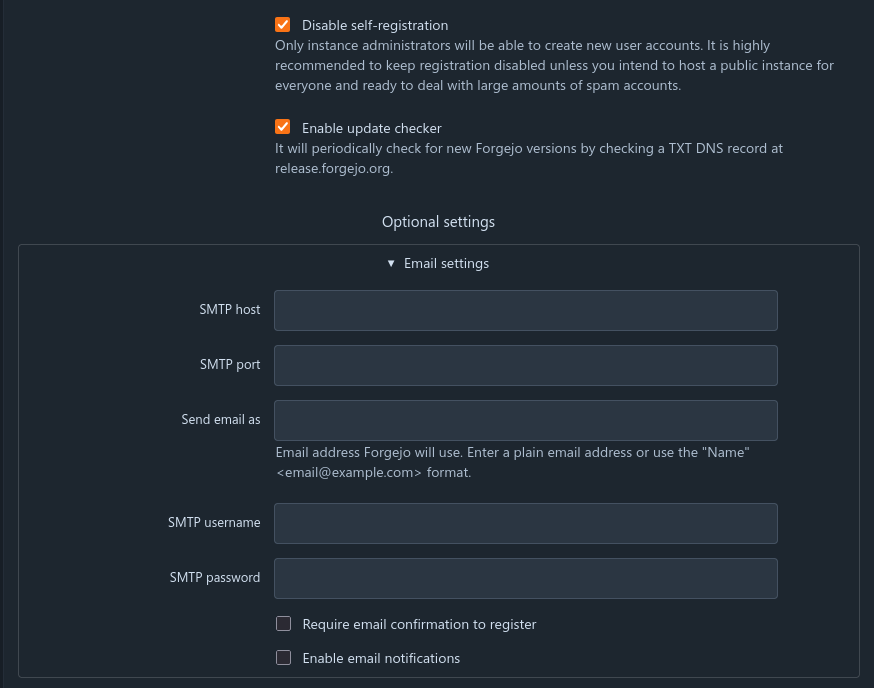
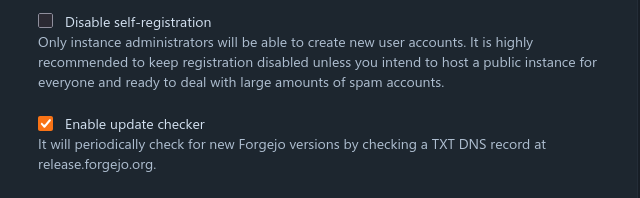
Now, for SSO login to work as we’d expect it do work, I’ll enable self-registration, and in later steps, I’ll disable non-SSO account creation.
This will make it so accounts will be auto-created for people having an account in my Keycloak instance, but nobody else can register.
If you’re going with just local accounts, it is advised for the Disable self-registration toggle to be left turned on, unless you want to allow all people (including bots and spammers) to be able to host git repos on your servers.
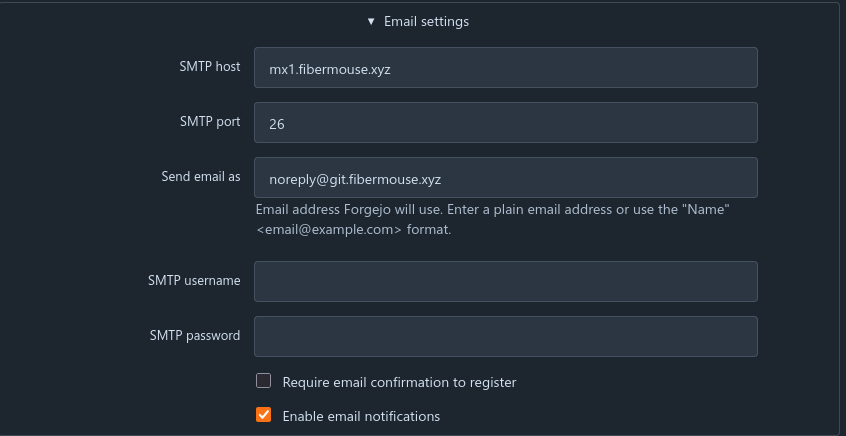
Email settings (optional)
If you’re running your own mail server and you want to use it for Forgejo to be able to send emails, like notifications, you can!
If you don’t have a mail server of your own, you may want to start doing so using Proxmox Mail Gateway, and Postfix+Dovecot - &TBD
This step can be skipped if you won’t be using this feature.
Service settings
In Server and third-party service settings I’ve counterintuitively disabled OpenID sign-in and self-registration.
This is because we’ll be adding our own SSO provider later as a separate identity provider rather than this.
As an important step, I’ve enabled Allow registration only via external services as mentioned previously mentioning registration.
I’ve also changed the Hidden email domain to noreply.git.fibermouse.xyz, so users can hide their email address.
There is an option called Require to sign-in to view instance content that is worth mentioning. I’ve kept it at default, so that everyone can see public repositories without an account. If you want it so only people with an account can view anything at all, you can turn this on. As my git server will be for public view, I’ll keep the option off.

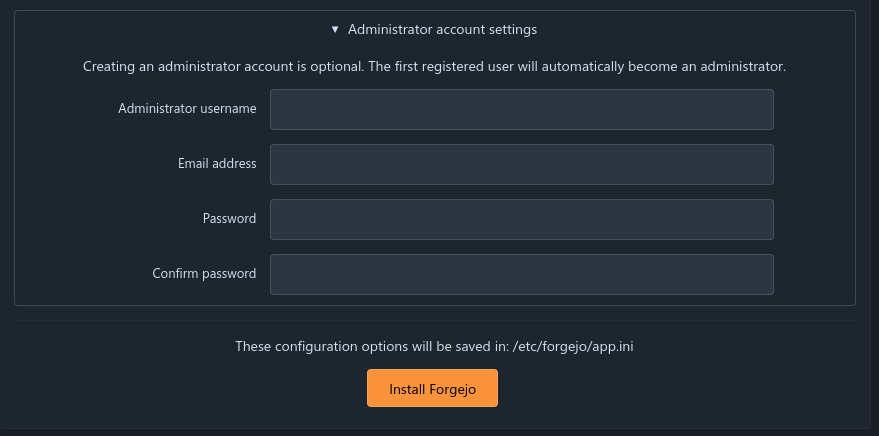
Administrator account
Now we’re required to set up a temporary admin account. It should either be highly secured, like a system root account, or deactivated before we expose our server to the public, though it can get useful as a backup in case we lock ourselves out of SSO or an user account.
It’s also required to provide an email for the user.
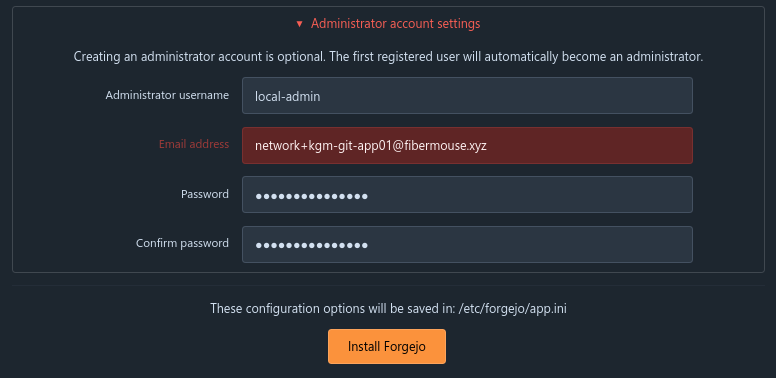 The administrator account will allow you to add actual user accounts via the Administration page, and in a later step, allow to integrate Keycloak SSO login.
As a last step, we can click Install Forgejo.
File configuration
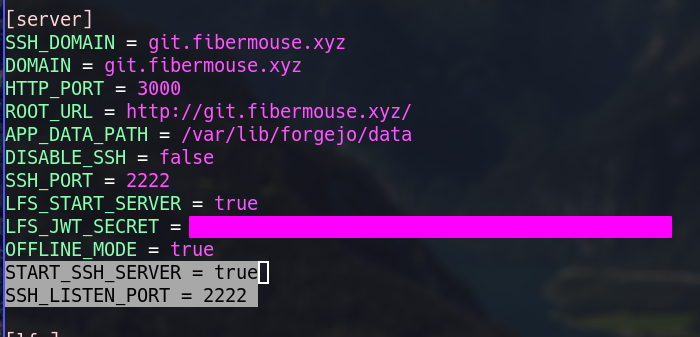
If needed, we can change the configuration we’ve made via web in the app.ini file:
sudo vim /etc/forgejo/app.iniI’ve decided to change the APP_NAME and remove APP_SLOGAN for visual appeal.
In addition, I’ve fixed the ROOT_URL to be https:// instead of http://.
Branch name settings
Some settings are not listed by default.
A useful one is DEFAULT_BRANCH in [repository]. It allows us to change the default branch name for repos. I’ve changed it to master for legacy reasons, as the default, main, is a newer convention.

Main page settings
I’ve changed the landing page to be /explore instead of the splash screen.
This can be done by adding LANDING_PAGE = explore in the [server] section.
Proxmox Mail Gateway SMTP fix
If you’re using PMG for relaying email on the default port 26, you may need adding PROTOCOL = SMTP in the [mailer] section, so it doesn’t force TLS.
Enabling SSH server
We also need to enable the built-in Forgejo SSH server for port 2222.
We can do it by adding the highlighted options in [server]:
After all configuration is done, we can reload the service:
sudo systemctl restart forgejoServing HTTPS
For HTTPS, I’ll use Caddy. Let’s install it:
sudo apt install caddyNow, we need to edit the Caddy configuration. It’s very simple:
sudo vim /etc/caddy/Caddyfile # or again, nano :)Here we have to replace the default config with our own:
(where of course git.fibermouse.xyz is your own domain name where you’ll be hosting forgejo)
NOTE: If you won’t be exposing your git server to the internet, you probably may need to add more options to change the way Caddy obtains TLS certificates.
git.fibermouse.xyz {
    reverse_proxy localhost:3000
}
Now, we can enable caddy, and restart it if it’s already started with:
sudo systemctl enable --now caddy
sudo systemctl restart caddy
If everything went right, and you’ve remembered to create a domain name at your DNS provider, when going to the domain name you should see an SSL error.
This is because Caddy will obtain the certificate only when exposed to the public, and it isn’t yet.
Harden the system
As a step I recommend doing, especially before exposing your server to the public, is to set up UFW firewall on the host.
I’ve already installed it in the beggining, so if you didn’t, it’s as simple as sudo apt install ufw.
Let’s now allow the ports in UFW, that we’ll be using. The ports are 2222 for SSH cloning, http and https for web access via Caddy, and ssh for management, that I’ll be locking to be accessible only via my Jump Hosts for security reasons.
sudo ufw allow 2222/tcp
sudo ufw allow 3000/tcp  # Optional, we'll be serving http(s) via Caddy anyway. This is mostly for debugging.
sudo ufw allow http
sudo ufw allow https
# If you wanna allow all SSH:
# sudo ufw allow ssh
# or from specific hosts only:
ufw allow to any port ssh proto tcp from **OMITTED**
ufw allow to any port ssh proto tcp from **OMITTED**
Now, let’s enable UFW and make it start on boot:
sudo ufw enable
sudo systemctl enable --now ufw
If you’ve been locked out of SSH after this step, good luck to you, you probably forgotten to properly allow SSH traffic in UFW, happens to the best of us :)
Expose the ports to the internet
This step is very setup specific. We need to let traffic on ports HTTP, HTTPS, and 2222 from the internet through our firewall to reach our git server.
I personally use a Juniper SRX300, thus for me this commit will do it:
# root@kgm-fw-edge01# show | compare
[edit security address-book global]
     address zco-auth-sso01 { ... }
+    address kgm-git-app01 2a01:115f:4015:28b0::2222:1/128;
[edit security policies global]
      policy DMZ-PERMIT-MAIL-GW01 { ... }
+     policy DMZ-PERMIT-GIT-APP01 {
+         match {
+             source-address any;
+             destination-address kgm-git-app01;
+             application ports_git;
+             from-zone any;
+             to-zone DMZ;
+         }
+         then {
+             permit;
+         }
+     }
[edit applications]
    application smtp { ... }
+   application ssh-alt {
+       protocol tcp;
+       destination-port 2222;
+   }
[edit applications]
    application-set iperf { ... }
+   application-set ports_git {
+       application ssh-alt;
+       application http;
+       application https;
+   }
For you, it may be different, depending on the firewall you’re using.
After exposing the ports, restart Caddy to obtain TLS certificates with sudo systemctl restart caddy.
Most is now done! You can now enjoy a basic Forgejo setup.
Allowing legacy IP traffic (optional)
You may also want to support legacy traffic from IPv4 users.
As the world has ran out of IPv4 address space a long time ago, you probably have one IPv4 address at best, CGNAT at worst.
I’m fortunate enough to have a public IPv4, on which I already utilize port HTTPS and HTTP for my web server’s reverse proxy, also using Caddy.
So for the legacy IP support, we’ll need to port forward 2222/tcp to our Git server, and in my case, modify the web server’s Caddy instance to also proxy for git.fibermouse.xyz to it’s HTTP port 3000. (Make sure you allowed it with UFW)
As my servers are all IPv6 only, my PAT setup will also do NAT64.
You may notice there is no allow rule for the firewall, that’s because I’ve already allowed the IPv6 destination before, and now I just NAT64 to the same v6 address so it’s already allowed.
# root@kgm-fw-edge01# show | compare
[edit security nat destination]
      pool HOST-kgm-mail-gw01 { ... }
+     pool HOST-kgm-git-app01 {
+         address 2a01:115f:4015:28b0::2222:1/128;
+     }
[edit security nat destination rule-set from-INTERNET]
       rule smtp { ... }
+      rule ssh-alt {
+          match {
+              destination-address 0.0.0.0/0;
+              application ssh-alt;
+          }
+          then {
+              destination-nat {
+                  pool {
+                      HOST-kgm-git-app01;
+                  }
+              }
+          }
+      }
Similar commit, but for application HTTP and HTTPS will do the trick for the other ports if you don’t have them in use for IPv4 already.
Now, on my web reverse proxy, I’ve added the following entry:
git.fibermouse.xyz {
	reverse_proxy kgm-git-app01.inf.fibermouse.xyz:3000
}
Now after making sure port 3000 is open on the git server, the A record is added in DNS, and that the required ports are PATed and allowed on our firewall, we can restart Caddy on the reverse proxy server, and it’s done!
OAuth2 SSO user login via Keycloak (optional)
If you wanna integrate your Forgejo user login into your already existing Keycloak + FreeIPA user database, follow along!
This setup will also sync the SSH keys of users from FreeIPA, if you’re using ipa as your Keycloak user source like I do.
Forgejo integrates really well with SSO login. For this setup I’ll be using SSO only for internal login, as I won’t be allowing people from the outside to make git accounts on my server anyway. My SSO server is hidden within my network and not exposed to the public internet, so only people on my VPN or at my house can log into my git server.
NOTE: I already have a rule in place that allows DMZ hosts to access the SSO server, if you’ll also be hiding away the SSO server from the public, and you divide your network into TRUST and DMZ, you’ll need the firewall rule too.\
Keycloak setup
This assumes you have a Keycloak instance up and working, and for the optional step, that it is linked to FreeIPA.
Add a client
Go onto your keycloak’s admin page. Then: Manage > Clients, and create a new client.
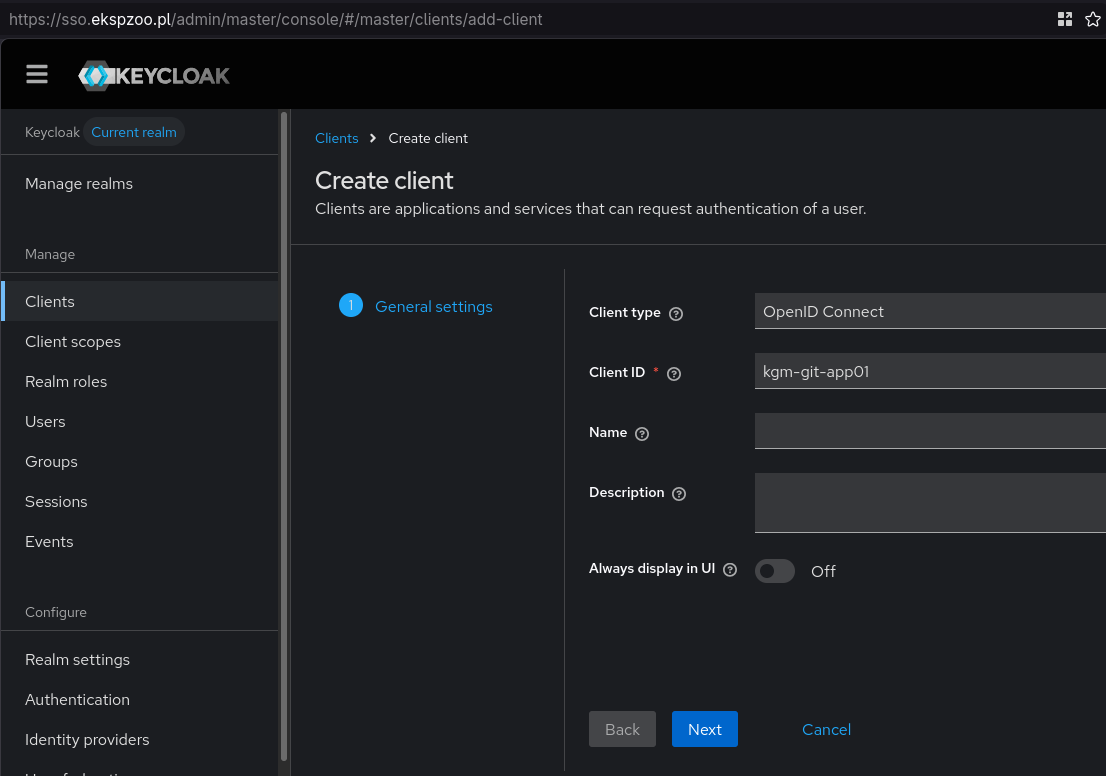 Set it up with a
 Client ID and press next.
Then, check the Client authentication, and also Service account roles.
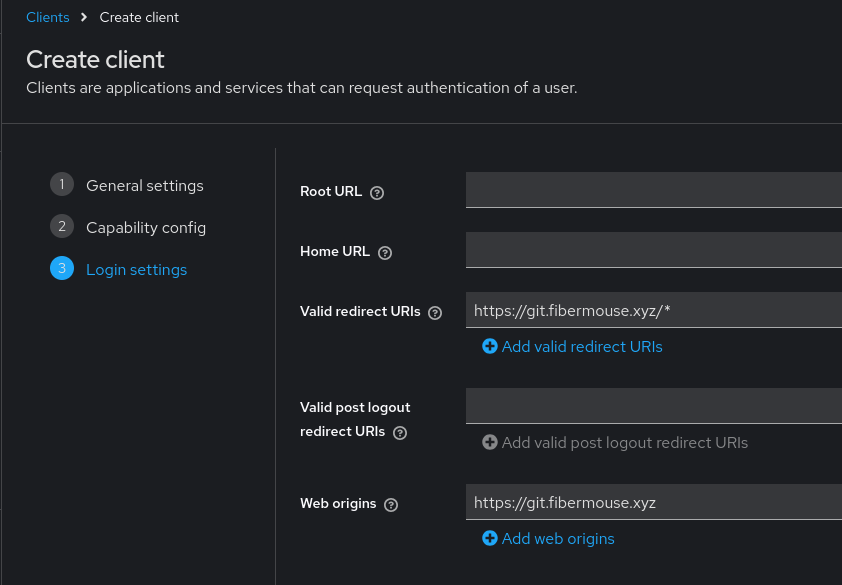
 In the next step, enter the git server’s URL like so:
 Now, you can save.
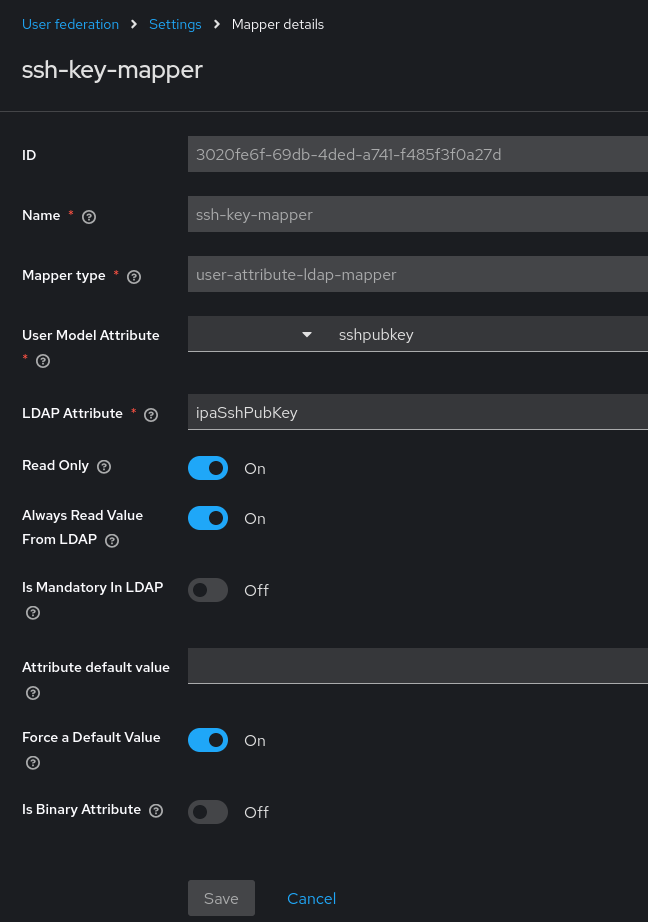
Source SSH keys from FreeIPA via LDAP
If FreeIPA is your source of users and groups for Keycloak via LDAP(S), you can sync users’ SSH keys into Keycloak, and later into Forgejo.
Go into User Federation, then into your LDAP binding, Mappers, Add mapper and configure the mapper like so:
 Now, sync in top right corner.
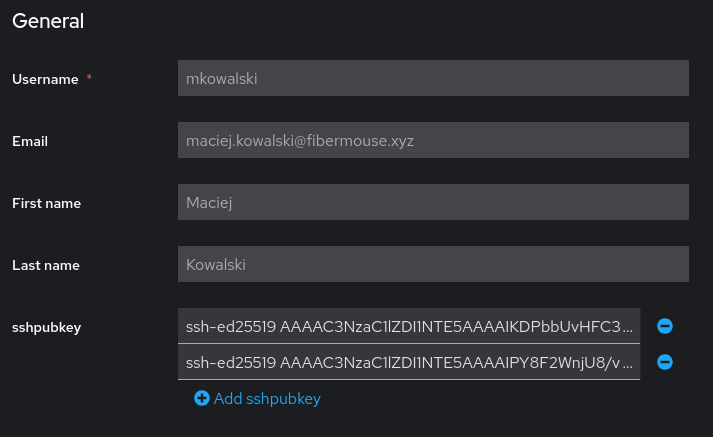
After this, your users should have this section in Keycloak, imported from FreeIPA:
Add a mapper to the client
Go back to the Client you’ve created in Keycloak. Then, go into Client scopes and yourclientsname-dedicated.
Now, Add a new mapper, By configuration and select Group Membership. Configure it like so:
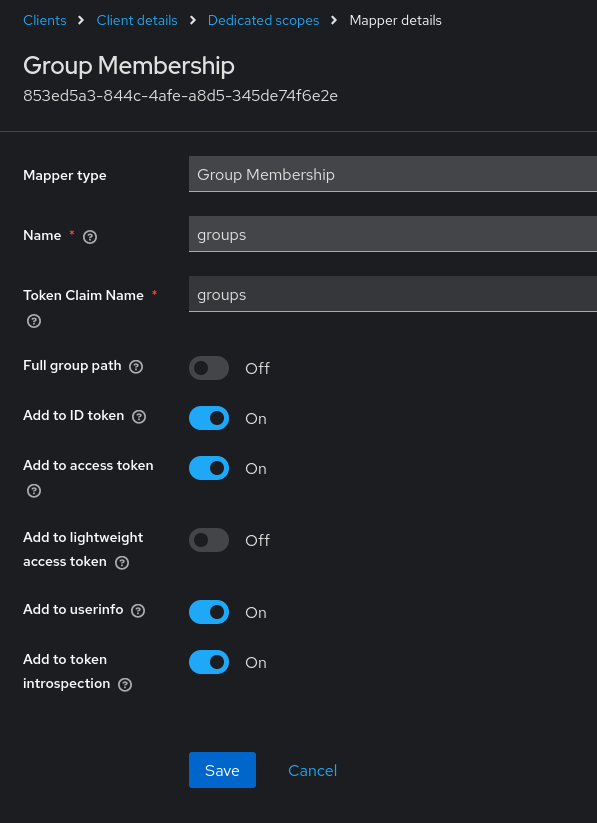 This will allow groups mapping for the users, so you can assign permissions in Forgejo to different groups.
Copy the client secret
In the keycloak client you’ve added, go into Credentials, and copy the Client Secret. We’ll paste it in Forgejo soon.
Forgejo setup
Log into an administrator account in Forgejo, to access the site’s admin panel.
Now go into Identity & access and Authentication sources. Then, press Add authentication source.
Set the Authentication type to OAuth2 and the OAuth2 provider to OpenID Connect.
Then, fill out the fields like so:
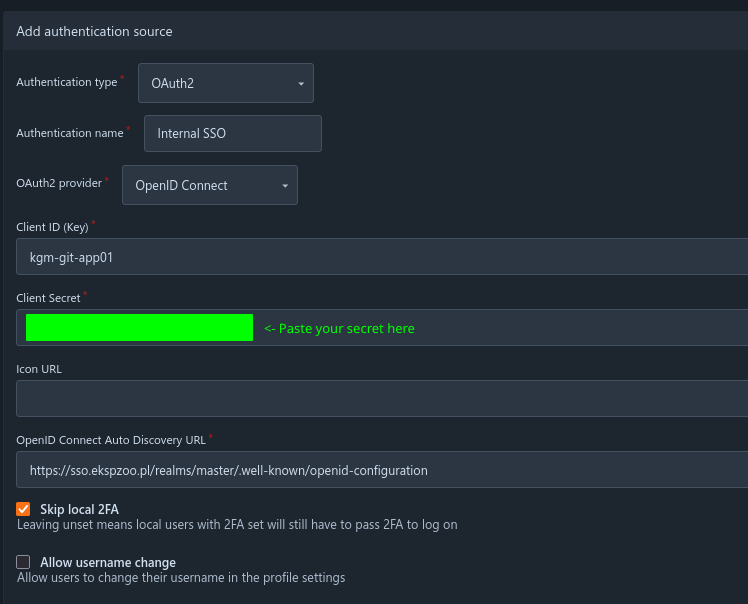
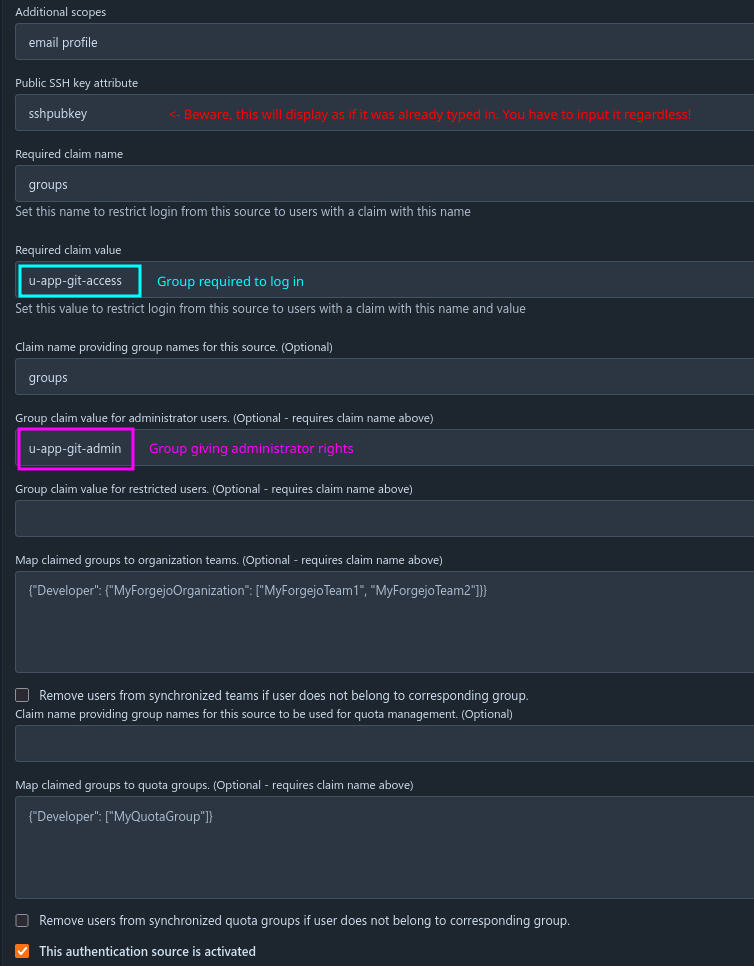
- Client ID = the client name you created in Keycloak
- Client Secret = the secret you copied before
- Autodiscovery URL = in Keycloak’s case, just replace the domain part with your own
- Claim Value = group that allows logging into Forgejo
- Claim Value for administrators = group that grants admin access
NOTE: even admin users need to be in the group granting basic Forgejo access!
It should now all work!
After choosing to log in via SSO and logging in there, Forgejo will prompt you to finalize user creation, and you’re in!
Now, after logging out, and back in again via SSO, the SSH keys and the administrator priviledges if you have any, will be copied over to Forgejo.